Tuesday, October 12, 2010

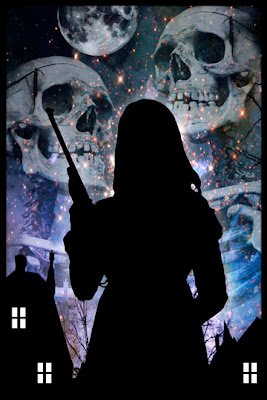
Update: From Digital Illustration to Silk Screen - Step One in Transition


This is an updated post. See content below first :)

Here is the same piece broken down in three colors ready for the silkscreen process. The next step is to turn each of these layers into black and transparent images to burn the screen. Once the three screens are washed the negative space is left and ink can be forced through on paper. Look for the final result posted here after it is printed tomorrow. 


Start Here

I'm starting to work towards creating some images that can be used to make art prints for the silk screen process. This is image is my first design that will make this move. I like it. It's all layer-y and pretty and has the feel of a a Lotte Reiniger film. Lotte was one of the earliest animators who worked in silhouette (and from Berlin - even better). I remember seeing her Pied Piper of Hamelin piece and falling in love with her careful and ingenious use of cut paper to tell (to me) a well known story. The visual quality of the silhouette also had a very creepy feel to me so this really works with my love of exploring the shadow themes in fairy tales. Keeping with my life long love of this type of story, I look at this piece as being a post-modern homage to kick-ass female leads in the horror genre. I will continue to update the process here and show the steps of taking apart and reconstructing in a different medium, but for now let's just say I'm very pleased with the look and excited to explore something new. The silk screen piece is being printed with the help of Madpixel and will be shown at the Ultra Pop Halloween show.

Saturday, October 9, 2010

Making Cyanotype Solution - Prep for the LVAA Photogram and UV Printing Workshop

In preparation for the photogram workshop I'm teaching at the Louisville Visual Art Association on Sunday I had a little fun with chemistry. This process is from Photographer's Formulary and is the new improved Cyanotype chemical prep. You can do this in your house, just be sure to use safe handling procedures for the chemicals.


This is not listed first on the instructions as the first step, but I do it first because it takes awhile to do completely. Finely grind 10g of potassium ferricyanide to a powder. *Wear protective gear! Gloves and a face mask!
The crystals will start out red but turn light orange as in the photo above. If you think you are done grinding, go ahead and grid it some more! You need a very fine powder for it to dissolve quickly.


 Heat 30 ml of distilled water to 120 degrees and add 30g of ferric ammonium oxalate, that will result in a green liquid when completely dissolved.


Under safe-light or a very low watt (25) incandescent light, pour in a 10ml solution of ammonium dicromate. (Not pictured)

While the solution is still warm (I keep my beaker in a pan of 120 degree water) pour in the fine ground potassium ferricyanide and stir until no red or orange crystals remain and green crystals begin to appear. Allow this solution to cool for 1 hour until just about room temperature.

When the solution has cooled strain the liquid through a filter (a standard coffee filter will do). A green sludge will remain on the filter which can be discarded. To the filtered liquid add 100ml of distilled water and put in a brown or dark colored bottle with a tight fitting lid. The solution can be painted on paper with a brush or use a glass coating rod. This chemical will last about 1 year in a tightly sealed and dark bottle.